Friday, 17 January 2014

Changing Your Mind

Mind-Changing Dilemmas with Shifting Trends

I fib you not when I tell you that I have been accused of being 'fickle' on more than one occasion. And truth be told, when I squeeze myself under the microscope, I suppose I can't really deny it (nothing's as cathartic as admitting to your own warts, right). 

So given this disposition I seemingly have to mind-change from time to time, I suppose it is only natural that eventually there would come a time when I would regret a furniture transformation.


And Im sad to say that it has arrived.  The subject is our very own coffee table set, of which one of the end-tables can be seen in the picture above.  You see, Mr. Chuckles inherited some furniture from his grandparents years ago, and when I first started to foray into the world of furniture rehabbing, I naturally painted and refinished everything in the house, and these vintage gems were helpless in the wake of my brush.  When I stripped and re-stained the coffee table and one of the side tables, I hadn't yet come to appreciate the beauty and trendiness of the Mid Century craze. Doh.


At the time, we only had the coffee table and one end table on display, so I didn't bother refinishing the second end table (pictured above).  At Christmas, we had such a full house of people, that Mr. Chuckles decided to bring up the remaining (unfinished) table to accommodate all of the drinks and merriment. It was at this point that Ol' Blue Eyes started crooning in my head 'Regrets, Ive had a few...'.   You see ladies and gents, the unfinished one looked AWESOME. Especially since we have wallpapered our back wall in a trendy 70s-meets-contemporary pattern.


I suppose its only natural that your style changes over time, and where I used to love everything that looked chic and contemporary, now I am moving to more of a fusion blend of contemporary and vintage combined.  I really love all things MCM at the moment (in fact Im going to check out an MCM dining table set tomorrow that Im hoping to put in our small dining area)and suddenly, magically I love the colour walnut again when two years ago I thought it looked like vomit.


I j'adore the way the walnut makes a great organic break-up to all of the colours.  The refinished side table, and also matching coffee table now look too dark to me; I finished them in a really dark stain called 'kona' that I saw at a friends house and loved.  So that's that. Little ickle fickle me.  

So naturally I am now toying with the idea of stripping them (again) and reverting to the original walnut. The curves of the legs are so great and they remind me of the 'Brasilia' range of dressers and credenzas.   


Above is another closer-up shot of the Kona stain.  It is so dark that you can't see any of the wood grain.  Mr. Chuckles thinks Im a moron, and I can't lie, I kind of agree with him.  I actually came across an old picture of the coffee table in its original state the other day and my heart sank a few fathoms. 

Darn it all to hockey-sticks that I didn't have the vision to see how cool mid century walnut or teak furniture was going to be again.  And dang those bloody magazines for setting a trend that I used to have but then cast aside...  Now that I think of it, I just cleaned out the closet and have a bag of 'old' clothes that I don't wear anymore abound for Vinnies.  Hmmm. Maybe I should rethink that decision too. Maybe, just maybe, purple-suede platform shoes are going to make a comeback just to spite me.

If you have ever had your own 'refinishing regrets', please let me know, because after all, misery loves company. :)

Sunday, 12 January 2014

Two-toned Nightstands

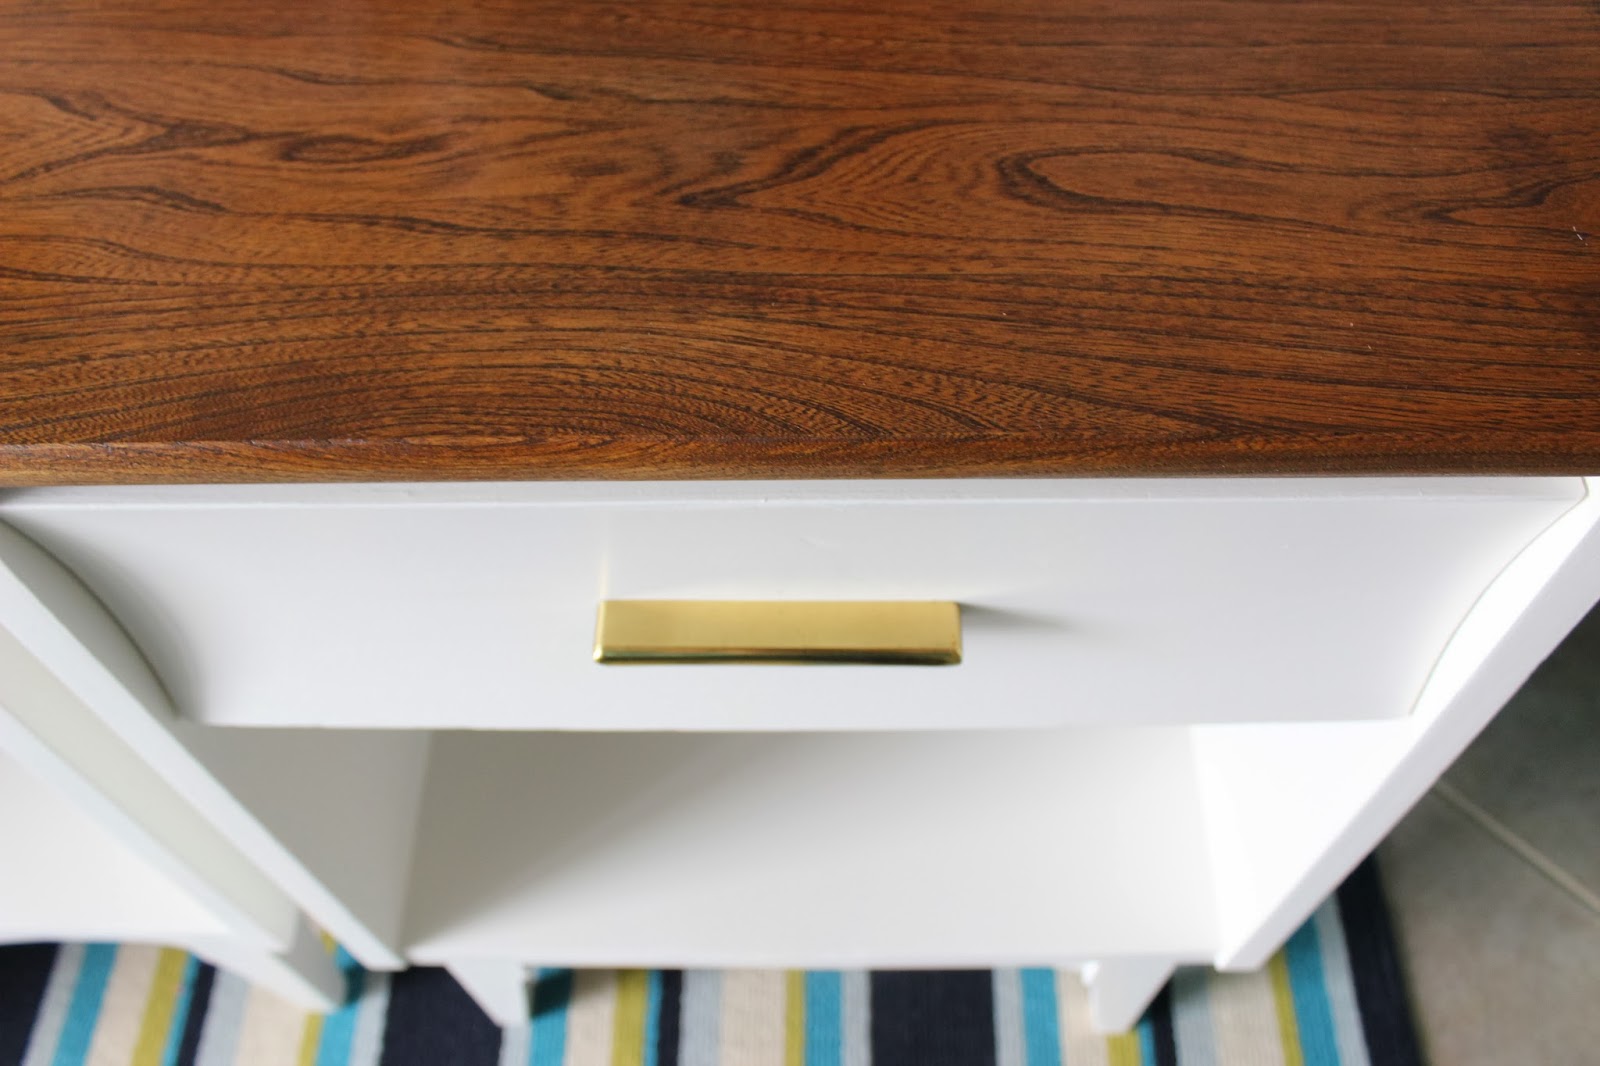
I actually painted these cute little nightstands before the Emerald/Green 9-Drawer, but I was so excited to post about that one (I love the way it looks!) I posted that one first.  These little guys are solid wood and were in great shape when I picked them up.


I went back and forth about what I wanted to do with them.  I knew I wanted a two-toned, but I couldn't figure out what to leave wood and what to paint (off)white.  In the end I kept it simple. I refinished the tops and painted the rest of the piece in white.


First I stripped back the tops and sanded the body and smoothed everything out. I then taped off the underside of the top piece and stained it using a dark walnut / light walnut combo.  After the stain had a chance to dry I primed everything using Zinsser BIN as I was worried about bleedthrough.  I used three coats of my Dulux in an off-white, and finished with a few protective coats of polyacrylic.


Easy peasy, this was a really great small project which I did straight after the China Cabinet that almost did me in (read about it here). Sometimes after you finish a mammoth piece you really need to cool your heels and do something small and textbook.


I filled the holes from the old hardware, and opted to use these contemporary looking gold pulls instead which I have used before (here) and (here). I think they give the piece a nice and chic feel.  I also love the way the wood grain looks with the new finish.


A New Camera and an Emerald Beauty

I love Christmas.  The lights, the snow, the coziness, the steaming mugs of hot chocolate.. I lived in Australia for many years during my twenties and early thirties, and I never could get used to the hot Christmas'. It just didn't resonate with everything I had come to know during my childhood. Firmly back in Canada now, I am happy to say that Christmas feels 'right' again.  

But sadly, I have come to find that the older I get, the less that ol' Saint Nick gets it right.  This year the old codger wasn't entirely off the mark, he brought me a staple gun attachment for my air compressor (all you other furniture gals can appreciate how this is a useful tool), but what I had asked for in my 'Dear Santa' letter was actually a new camera.   So when I unwrapped the wrong-shaped present, I vowed two things. Firstly, Nickster had seen his last plate of cookies from me, and secondly, I would brave the shops on boxing day and buy myself a new camera.

And I did.  In fact, this beautiful green dresser was the very first subject I shot with my new Canon.  Problem is, I don't think the pictures are that good.  Eeeek.  Maybe next year I should ask Santa for some skill and talent. I realize I will need to work at it to get better, but I have to admit I thought I would just pop in an SD card and magically transform into Ansel Adams.

painted emerald dresser

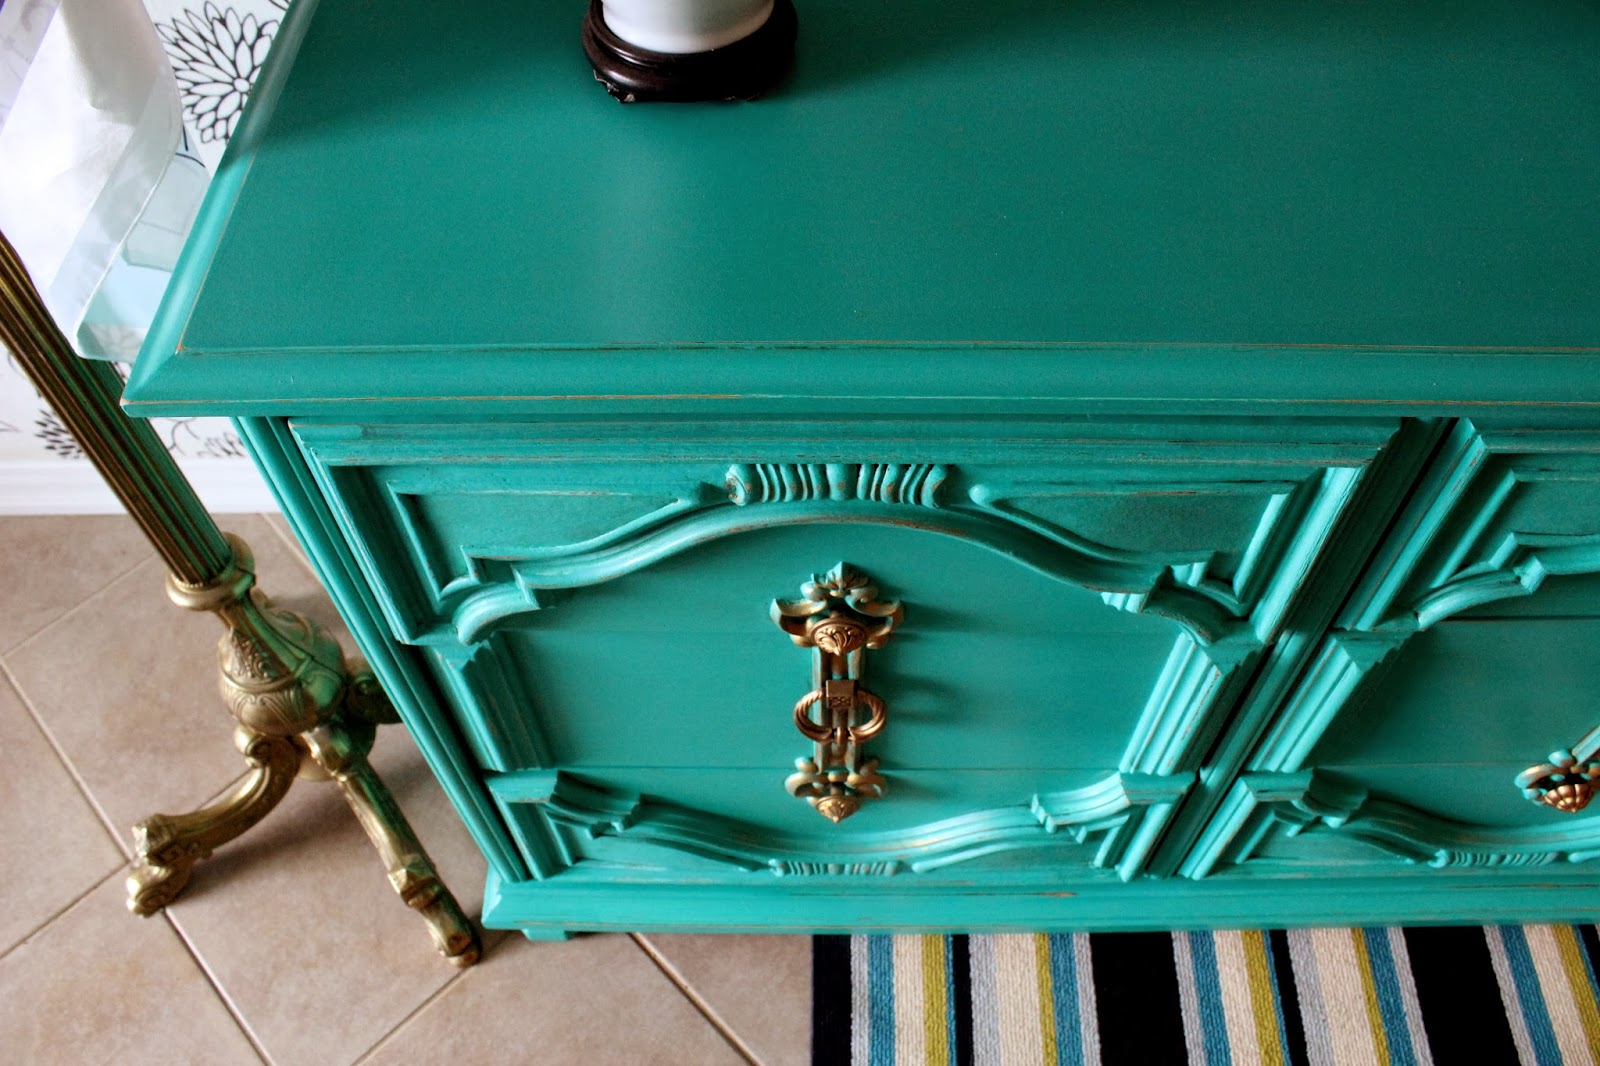
But let's plough ahead with the details of the transformation.  Mr. Chuckle's and I are off on holiday to PERU for the month of Feb, so I promised him this would be my last transformation before we depart so that we have lots of time to get organized and trip-focused.  I scored this absolutely beautiful solid wood Peppler's dresser from my favourite restore.  I shouldn't say 'scored' actually, because she wasn't exactly a steal, but given the great shape, and beauty of her, I was happy to pay a little more than usual.

painted emerald green dresser gold hardware

Ive been loving green at the moment, and I custom mixed up this colour with some tint and dulux lifemaster paint.  I sanded first and than primed the entire piece with Gripper which I had tinted a minty shade of green.


I painted one coat of primer and let that dry for a day, and than followed up with two coats of the green which I turned into chalk paint with plaster of paris.  I had to sand between each coat to get a smooth and satiny finish, but its worth it to be able to play with colours (not to mention afford the paint!). 


 I used to find I had adhesion problems with chalk paint and would be able to scrape the paint off with my fingernail.  I have learned a couple of things along the way that help prevent this. A) I always sand. B) I always prime. I find the topcoat paint sticks to it better. C) I buy a good paint (not sample pots) that has good adhesion - I really love Dulux.  and Lastly (D) I wait a full day or sometimes two for the paint to cure before I wax it.  Waxing moistens the paint underneath again and makes it suceptible to scratches. Kind of like when you paint a second coat of paint it moistens the coat underneath it. You can read all of my TIPS about BETTER DIY CHALK PAINT by clicking HERE.


painted dresser emerald green diy chalkpaint

 After I finished painting and giving a smooth sanding, I used some black glaze and highlighted the raised detailing on the front of the piece.  I than lightly sanded and distressed the edges of the piece, being careful to keep it light and rustic.  I than used dark wax only - Minwax and waxed the entire piece and buffed to a low sheen.


 I used rub-n-buff in grecian gold to liven up the contrast of the hardware.  I also used the rub-n-buff on the raised detailing that the hardware sits on to make it appear that the whole center area of the piece is a solid piece of gold hardware.  I LOVE how the gold and green go together.  So regal!


You can see the rub n buff in this close up shot.  I have a very similar piece in my living room that we use for our media unit.  Mine is more of a blue-turquoise colour, but it has that great contrast with the gold hardware which also received a few lashings of rub-n-buff.


In this corner shot, you can see the lighter colour of the primer peeking through.  I find this is another great technique that using primer under chalk paint allows you to do.  Its amazing how many techniques and tricks you pick up as you keep painting (and so many of them by happy-accident!)


Here is the before.  Isn't she a stunner. I actually get little pangs of guilt when I look at this picture.  It was so beautiful with such awesome grain that I almost wish I hadn't painted it.  I think there is a purist lurking deep inside of me.

Chickadee-China, The China Cabinet!

DISCLAIMER***   This is a very long post, author accepts no responsibility for eye strain which might result from reading. However, author strongly recommends you should read the post in entirety.


If ever there was an instance in my life where I thought a lobotomy was in order, it was during the transformation of this hefty lady.  Some of the ingredients I used in the brew of this concoction included, orbital sander, sanding sponges, chipped fingernails, Glidden Gripper primer, blood, Purdy paint brushes, sweat, tears, more tears, a nervous breakdown, another nervous breakdown, nightmares, Benjamin Moore Cabinet Coat, polyacrylic, stripper, rub-n-buff, wallpaper, a U-haul rental truck, and you guessed it - one final nervous breakdown.  And that ladies in gentlemen, is just the tip of the iceberg.


I sincerely had no idea just how much work is involved in transforming a China Cabinet. I mean, she didn't look that intimidating. When I glanced at her picture the words "bloody high maintenance - STAY AWAY" didn't leap out at me. She seemed harmless enough.  What a shocker I was in for!

This girl was a fickle princess right from the start.  When I picked her up from the lovely client's house it was (up until that point) the coldest day of the year. A blustery -22 with a windchill of -30.  Fingertips froze and eyelids wept as we tried to load her into the back of the pickup with insufficient tie-down straps.  We got about 10 minutes down the road before the upper piece toppled over and almost fell onto the unsuspecting car chugging along in the lane beside us (Thank the Lord we had removed the glass panes and left them at the client's house!)

 I was manning the wheel when I saw this all happen slow motion in the rear-view mirror.  "NOOOOOO" I bellowed to Mr. Chuckles.  We quickly swerved off the road into an ambulance bay.  Manuevering into the only spot to park, I challenged the big 'NO PARKING' sign with one of my dirtiest teacher looks.  I banged on the four-way caution lights and Mr. Chuckles and I prepared to enter the arctic circle (once again) and attempt to fasten this pretentious chicken down.


20 minutes, and two cases of frostbite later, we had fandangoed a workable solution and we were back on the road ready for the 1.5 hr drive home in some terrible road conditions.  Once home, we managed to unload her into my workshop where I left her for the next couple of days to reflect on her behaviour.  Occassionally I would crack the door open a bit and ask her if she had learned anything from the situation.  True to form, she stubbornly said nothing.


A few days later I had emotionally recovered enough to get the transformation rolling.  I spent 1.5 hours removing her hardware, hinges and doo-dads as well as popping out her backer boards (on the average 9-drawer dresser this takes me 8 minutes)  I then set about to sand her down.  This took three hours. THREE HOURS to sand.  WHHHHAT?   Because of limited space, I painted all the doors and shelves downstairs in my basement and the bodies of the two pieces in my workshop.  Each coat of paint took 4.5 hours. 

Lets just take a sec and do some simple math   4.5 hrs x 5 coats (primer and paint) = 22.5 hrs.  I then topped most areas with 2-3 coats of polyacrylic (add about 4 additional hours) 

Grand total for paint time (26.5 hours).  


I also spent about two hours sanding hinges and hardware and coating with rub-n-buff or gold spray paint. And after some back-and-forthing about whether to do a stencil on the inside of the cabinet, or wallpaper (I settled on wallpaper), I spent an additional three hours wallpapering.

 I use a brush/roller combination and although all of the flat sections were a breeze, there was so many corners, edges and curvy bits on this that I was in serious agony. I had to be so careful not to put the paint on too heavy as drips formed so easily.  Ive realized how much I love flat surfaces now and from this point forward I vow to ONLY paint Countertops!  Due to lack of a bench, I spent the majority of time on my knees painting. Three weeks later and the scabs are finally coming off.  I think I should be able to walk again soon.


Just when I was nearing the finish line, I noticed some imperfections in the paint finish of the top section of the bottom piece.  My anal-retentive nature got the better of me, and In a moment of frustration I made the decision to strip and repaint the top and edge of the lower portion (congratulations Rae, you have just added another 10 hours of work to this project!).  I don't regret it however, as it turned out much better on the second round, but stripping back the edges of the top section was a lot of work, and although I cant be certain, I think I can feel cancer cells developing in my esophagus.


We experienced some seriously cold winter weather during the three weeks it took me to transform this piece, in fact it was so cold that I could not keep the workshop at a consistent temperature so we ended up needing to bring the upper and lower portion into the house in order to get proper cure (Mr. Chuckles would normally veto this, but when I broke down in sobbing tears on the floor his heart turned to mush). Due to us not having..erm.. that large of a house , the upper section made herself comfortable in the middle of our kitchen.  Nothing like walking into your kitchen for two weeks with a china cabinet plonked in the middle of it. I had to tie up Miss-Do-As-I-Please so that she would stop using it as a jungle-gym, and Im pretty sure I caught Mr Chuckle's having conversations with it on no less than two occasions.


To inject a positive note into this tale, I did discover a great new paint my Benjamin Moore called 'Cabinet Coat'.  It is a satin finish and dries really hard.  We had it tinted to a creamy off-white colour.  It honestly spreads like butter, so lovely to work with.  For the wallpapered background we used a contemporary paper which I found here in Canada at a store called Bou-Clair.  In fact, I loved this paper so much that Mr. Chuckle's and I chose the same paper  (in gray) and have since wallpapered our living room.


After three weeks, I was so happy to be able to deliver the finished piece to the client.  But after the debacle we experienced to try and get her home, I decided to rent a u-haul for the return trip.  It arrived safe and sound thanks to some patience and the helping hands of Mr. Chuckles and my dearest Father (thanks Dad!).


I learned one valuable lesson from the experience.  Never, ever, under no circumstances paint a China Cabinet ever again.  Sometimes in life, the most important lessons are the simplest.