Showing posts with label 9 drawer dresser. Show all posts

Tuesday, 15 April 2014

9 Drawer two-tone MCM

Ahhh, more two-tone mcm goodness.  This one attracted a lot of attention.  I had a lot of people responding that they loved the slanted drawers.  At first, I didn't really like them, but I have to admit they grew on me.


I followed my usual routine here, sanding back everything and then priming and painting the casing, and gel staining the drawers.


The tall legs are great on this piece.  So airy.


Im feeling a little lazy to post a lot of the details, especially when I feel I do this look so often that the few readers I do have, are probably bored of it by now!  So I shall let the pictures speak for themselves! But if you do have any questions about how I achieved the look, feel free to leave a comment!

Friday, 6 September 2013

Ornate + Mint + White = Yum!

This solid wood dresser was in fantastic shape when I picked her up.  She was a lovely dark wood and had been taken well care of over the years.  I hesitated for a moment before breaking out the paint cans.  But like a good addict, I conceded in the end!


I wanted a break from turquoise, thought about a nice dark grey, but in the end I went with a mint/white combo.

This piece has fantastic hardware!  Large, solid and very curvy.  They just don't make hardware like this any more!


I bought some new paper about a week and a half ago and got to put it to good use!  This is a floral mint/white paper and it goes perfectly with the theme.


I used modpodge to attach it - easy peasy!


I used my Zinsser primer again and tinted it a similar shade of green.  I used my favorite dulux paint in satin for the body, I custom tinted using some green tint I got from the paint store  


I painted out some of the trim in white, and then distressed it a bit to age it up.  I also distressed the entire dresser lightly.


I think this piece would lovely in a nursery, or a room featuring neutrals or soft pastels.


And here is the before - quite the looker in her original duds, wouldn't you agree?


Linking up to:
missmustardseed
http://www.flusterbuster.com/
http://www.theshabbycreekcottage.com
http://www.redouxinteriors.com

Thursday, 29 August 2013

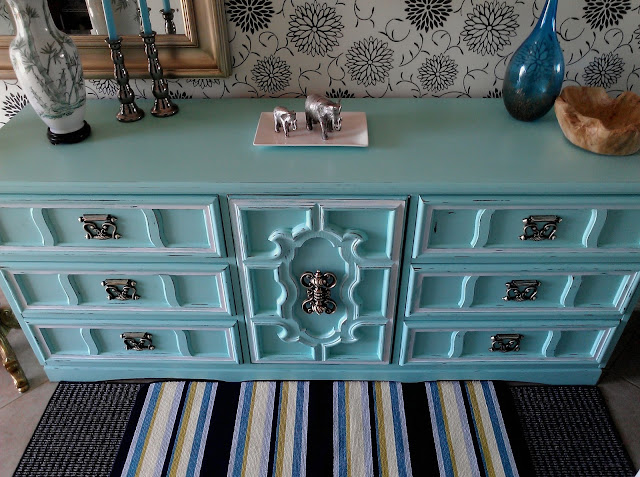
Aged Light Turquoise

I custom mixed up this colour.  It is a nice feminine blue-turquoise.  This dresser was in fabulous vintage condition.  A great find with all the detailing.

  
I sanded really well, and then primed the entire thing with Zinsser BIN (I find this stuff so frustrating to work with because it dries so bleeping fast, but it has aaaaamazing adhesion)


After my Zinsser dried (about 4 seconds later), wink wink, I painted on two coats of the turquoise.  I then highlighted the recessed detail with cobalt blue, and the raised detail with a lighter shade of the turquoise.


The result was very pretty, but not nearly edgy enough, I decided to give everything a really good sand to make it look more ‘antique-chic’ and less ‘little girl’s room’.


Because the Zinsser is stubborn as hell, it doesn’t come away when sanded like the paint does, so its great for creating a layered paint look.


The hardware was very dull and dingy, but I used my old sanding technique to bring out the soft gold lurking beneath.  I then shot a blast of sealer to prevent future tarnishing.


I picked up four new rolls of decorative paper a couple of days ago, and it was a real toss up to decide which one to use on the inside drawer facings.  I decided to go with a grey/white chevron pattern.  I kind of think it gets a bit lost against the boldness of the dresser.  I had a great dragonfly on butcher paper one, I wish I’d gone with that one instead!  Next time.


And here is the before. Not a bad looking lady.


Linking up to missmustard seed.  Have a great long weekend!

Friday, 23 August 2013

One Dresser - Two Different Ways


In a previous post (here) I talked about how lucky I felt when I found a particular dresser that had slipped through my fingers a few months previous.  I painted it up in a teal/turquoise with lots of highlighting and distressing and I was so happy with it!


 Fast forward a short two weeks later and I couldn’t believe my luck when I found the same dresser again!  ‘Woop-Woop’ I wailed at my good fortune.  ‘Raw-Raw’ I cheered at the reasonable price.  I picked it up and soon found a person who wanted to provide it with a loving home.


She decided she wanted it painted in pure white to pop off a textured gray wall she had, and although that would not have been my initial choice (you know how I love those blues and greens!) I have to say, that I think it looks incredibly elegant and chic.  The raised and recessed detailing capture the shadows and play with the light so much, that it wasn’t necessary to highlight with another colour.


It took a lot of primer and paint for coverage though (one of the pitfalls of white).  After sanding really well, I primed using Zinsser Cover Stain because it has great adhesion.  I then topped with Dulux Diamond in pure white (my go-to paint).  I used a satin finish as I prefer a lower sheen on my white furniture (apart from factory finished furniture – in that case I love super glossy).


On my previous piece I buffed up the hardware to a soft gold using a sanding block.  The future mother of this baby-girl was more partial to silver though, so I decided to use spray paint.  


I am going to detail the steps I took in a separate post, but to be brief, I scuffed up the hardware with sandpaper, sprayed with Krylon Metalic silver, and then topped it with black glaze to age it up. I then sealed it in with a spray sealer.  Im very happy with the result.


One downside of this dresser was that she was a little on the short side – she only stood a meagre 30” tall.  So like the other turquoise one I painted, we decided to custom add a cute pair of stilettos to this girl – enter Mr. Chuckles for some expert help. 


I sourced a pair of vintage legs, and repeated the same process as I did on the dresser – sand, prime, paint, seal and we attached them using brackets.  The height makes all the difference in the world in my opinion!  I love legs on dressers, and have added them to many now.  It’s a fair bit of work, but the result is so worth it!


Thursday, 11 July 2013

Turquoise Distressed Dresser

This piece was so much fun to work on.  It had so much character with all that ornate detailing, and the hardware is simply swoon worthy!


I felt really lucky to find this piece because a few months ago I responded to an ad for the same set and tried to get the seller to just sell me the dresser (and not the rest of the set).  My offer was refused and I remember I was so upset because I had such a vision of what could be done with it.


Fast forward 4 months, and I found the same dresser, for sale all by itself!  Thank you furniture gods!


I confess I was going to use emerald.  In fact I had behr 'precious emerald' colour matched in my dulux as I was inspired by this piece by Pam at 'Simple Details' .  My emerald turned out much more 'forest green' than this one though, and I was a little reluctant to try it out.  So instead I played it safe and opted for my fav shade of turquoise (again!).


I painted the insides of the recessed detailing two shades lighter than the  turquoise body, and again accented with some blue and yellow.  Everything got a good distressing to 'vintage' it up a bit. As usual, the detailing is hard to see in the pictures. Sigh.


I just can't get enough of the hardware.  They are little works of art all by themselves!  They are like butterflies, all set to flutter away.


linking up to:

missmustard see.com

http://www.savvysouthernstyle.net/