Thursday 31 October 2013

Stripping in the Cold!


Well I did it, I finally took the plunge. After numerous pieces of mind numbing, elbow aching orbital sanding dust clogging up my eyes, I finally decided to try stripping.

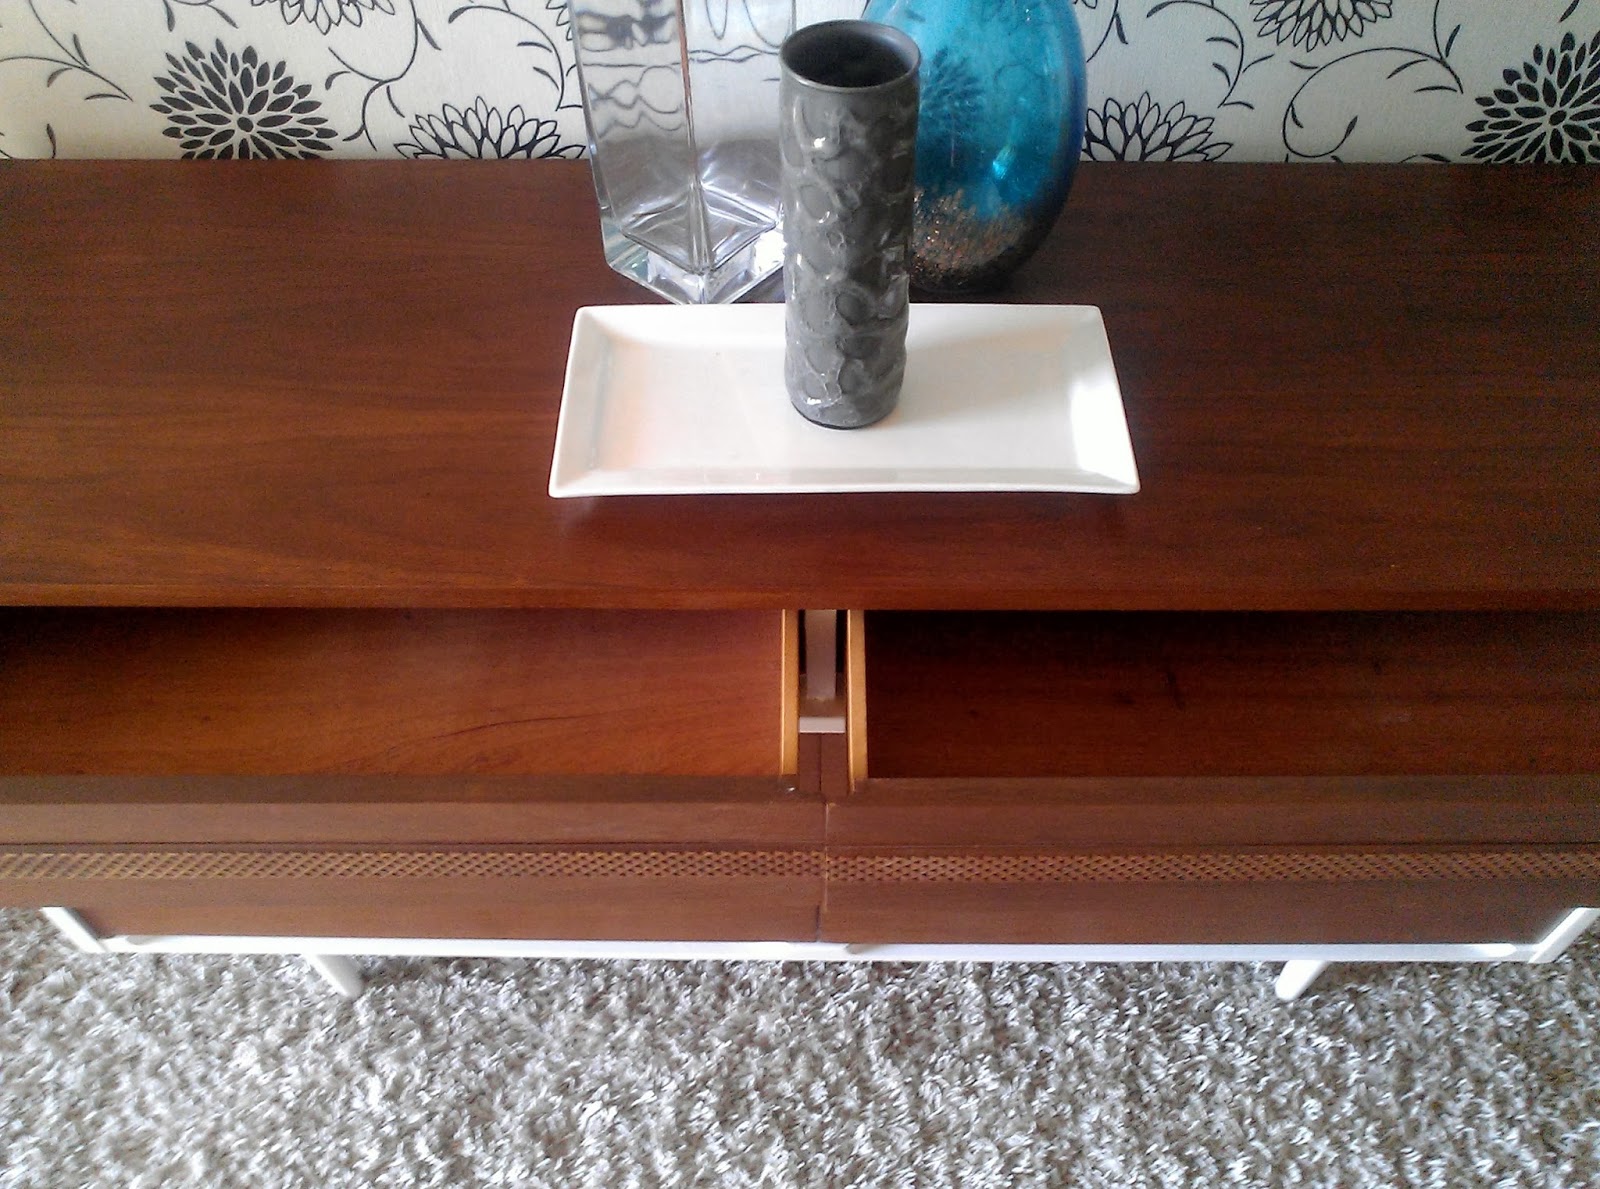
The piece was the beauty below. She received quite a transformation and required a hhhheck of a lot of work. But no whinging in this post, nope, this post is dedicated to the virtues of "Circa 1850" which stepped in and took over when my elbow was so exhausted it was bending the wrong way.


For some reason, the finish on the top of this piece resisted sanding. I tried, it didn't yield. I tried harder, it dug its heels in. You can see from the picture below how far my 35 minute effort got me. About 1/8th of the way through the top. 'No thanks,' I said. 'No thanks,' Mr Chuckles' seconded.


So it was off to RONA to wade into the slippery pool of stripping aides. They only had one product. One. It was fairly priced at $11 for the can, but I was a little doubtful that this particular can just happened to be the magical brew I was looking for. How wrong I would be!

I handed over the cash, had an encouraging nod from the salesman, than the can and I drove home together eyeing each other up suspiciously. 'Really?' I thought. Is this really going to magically eat through that ridiculously thick finish?


It did. I cajoled Mr. Chuckles into helping me, handed him over the pink 'domestic goddess' gloves and stood well back with some goggles protecting my peepers. He carefully opened the over-pressurized can and set about slopping the stuff on with a paint brush. We went inside (it was cold in the garage) had a cookie, watched a commercial or two, and went back out to find this.


Mr. Chuckles grabbed his spatula and started scraping with gusto. I couldn't believe how easily the stuffed flopped right off in great big leathery chunks. Our eyes locked in mutual astonishment. 'Can I have a try...' I ventured. But no way was Mr. Chuckles handing over his spatula. He was having too much fun.


In total, we spent about 4 minutes scraping off the entire top of the dresser. Well worth $11. After it dried out, we still smoothed things out with a once over with the orbital. But it took minutes, not hours.


So there you have it.  No need to tear a hole through your elbow anymore.  Fling that orbital sander in the corner and grab a can of the good stuff.

Oh, and by happy accident I discovered that it works a treat on getting old dried paint out of brushes.  You know, those ones that you forgot to wash and left sitting on top of a milk crate somewhere only to discover three days later that it was stiff as a board. Well, I have found the cure.


One for the Stag N Doe

What a week.  I have been working painstakingly on a dresser that got quite the overhaul, and some matching nightstands.  It is one of those pieces that turns out to be ten times the amount of work than you expected.  Tomorrow I am buying a nice bottle of bubbly which I will uncork with vigor when it is all done. Not long now. I can see the light.

But lets save that post for another day.  Instead, lets talk about this beauty below.  She is a nice antique piece with a matching mirror.  I decided to donate a piece for Mr. Chuckle's sister's stag n' doe party in lead up to her pending nuptials.  They are raffling off a lot of prizes, and I thought, 'Hey. why not a piece of furniture?'.  So it was with that in mind that I kept my eye out for a nice piece.


I found this one at a steal.  It was at my favorite re-store.  I must have been quick that day, because usually these types of pieces get snapped up quickly.  I was so enthused I walked out without paying.  So literally, a steal.


I did pay on my next visit though, guilty conscience be damned.  It was in rough shape.  Mr. Chuckles and I had to do a lot of sanding and wood filling to bring this lady back to the land of the living. I believe she made a guest appearance on the Walking Dead at some stage in her past.


I love the little key hole details.  They are real locks too.  No keys, sadly. I know a lot of bloggers put knobs on these dressers, which I really like..but Im also a big fan of ring pulls. So I gave them a bit of a buff and left them original.


These pictures are appalling, I know.  I was in a rush.  The camera was cranky.  Dresser wouldn't sit still.  Bad photo session all round.


A bit of the distressing detail. I kept it pretty light all round.  I should also mention that I turned this into a chalk paint using PoP.  I like the patina of chalk paint/wax on these old pieces (I usually use latex acrylic and polyurethane).  I also waxed with MINWAX dark wax.  No clear.  But I find the Minwax dark wax to be subtle compared to most dark waxes, so you dont get that 'staining' in the paint finish.


And below is the before.  Certainly wouldn't stand out in a Miss America Pageant.  But hey, a little bit of make-up, some fancy lighting, and just a bit of well placed Hollywood tape, and whammo, say hello to Angelina Jolie.


HAPPY HALLOWEEN EVERYONE!

Wednesday 23 October 2013

Miss Frenchy Wears Teal

Isnt this a lovely looking french provincial dresser.  I drove a ways to pick her up from a slightly odd man.  It was dark and dreary in the room, so I was happy to get out of there quickly.

When I got home, I learned a valuable lesson.  Don’t let odd men in dingy dark settings deter you from really ‘checking out’ the piece.  Because it wasn’t until I got this beast home that I realized it was….eeek…laminate. 


Now don’t get me wrong, I have painted laminate in the past, and I will paint it again no doubt, but I certainly avoid it unless the dresser is either free, or a super-duper steal.  This thing was neither of those.  I didn’t overpay, but I don’t think I would have handed over that much had I known it was laminate. So lesson learnt!  Always check for presence of laminate.
.
  
Anyways, onto the fun stuff.  I sanded (lightly) and made sure not to go through to the MDF.  I primed with a good adhesion primer which I tinted to a similar colour as my top coat. 


When I came back a couple of hours later I realized I had left the garage door open, and apparently someone had stopped in for a visit because there were some strange markings in the finish.


I was able to apprehend the culprit pretty quickly though.  Blue paws tell no lies.


After priming, I did two coats of a colour I custom mixed.  I was inspired by a piece by Estuary Designs and wanted to mix up a similar colour.  In real life she is more teal-green, my camera favours the blue tones and I can't quite capture the colour accurately.


I gave the hardware a subtle spritz with some gold spray paint just to refresh them a tad.  


And here is the before.  Looks like real wood, or at least wood veneer, doesn't it!


Mid century modern set

Well Im slowly working my way through my stash of mid century pieces and the garage is starting to exhale again as the stress of containing everything alleviates.  Another problem is arising though - Im accumulating a surplus of dresser mirrors again. Doh!


It was love at first sight with this piece, and worth the one hour drive to pick her up.  She belonged to a lady who obviously loved her, because she was in very good condiiton.  The drawer facings and sides were all pretty great, only the top needed some TLC.


I set about sanding off the entire top.  Because there was not a heavy finish on it, it came off pretty well.  One problem I did encounter was I noticed the sandpaper on my orbital kept 'gumming' up very frequently.  Everytime this happened, the sanding slowed down noticeably and I would change to a fresh piece and it would come off effortlessly until it gummed up again.  So there you go, if you find that your finish is not sanding off well, than it could be because your sand paper is gumming on you.


I suspect the 'gummy' stuff was old furnture polish residue.  In the end I gave the entire top (all 78" of it) an overview sand to remove just the layer of gunge.  I then changed out the sandpaper (again) and the finish came off pretty well then.


I custom mixed up some stain to best try and match the rest of the piece.  I used gel stain.  It turned pretty good.  I then finished with a thick coat of Danish Tung Oil finish which really looks wonderful and matches the low sheen look of the rest of the piece.


These drawers are super-duper long, so the were catching a bit against the sides and each other, so I got the orbital out again and planed them a bit.


I cleaned up the rest of the dresser, and used gel stain to dab at some of the smaller blemishes.  I wanted to keep as much of the original finish as I could.

Next up were the nightstands.  Again, underneath a layer of mould, they were in awesome condition (apart from the tops again).


I used some retro material I picked up for $1 a metre at my favorite restore and lined the drawers.


I sanded back the tops only, and refinished them using the same steps as the long dresser.  The sand paper didn't gum up this time though, so I assume it didn't get the lavish furniture polish treatment that the main dresser did.


I really love this set with the long skinny drawers and the low look.  The credenza is only 27" tall. Very streamlined.


This is for sale on my ETSY shop


Friday 18 October 2013

And yet another two-toned MCM!

Here is the latest in my mcm marathon.  As I mentioned previously, I am working my way through my stash of pieces, next up is a long credenza and matching nightables that are going to get a re-stain.  Too beautiful to paint!


For this little gem, I decided to go for a slightly different look.  The top was in such fantastic condition that I decided to restain, rather than paint the whole outter casing white.

  
This is a little extra work, but fortunately the finish wasn’t super thick and glossy, so it sanded pretty easily.


Only the front facing trim was painted in off-white. Oh and the legs too as I wanted to create a sense of airiness.  The rest of the dresser and drawer facings were re-stained in walnut.


I love this little honeycomb-esq detailing on the top drawers, adds just that little bit of detail and texture to the piece.


 I was a little nervous about how just painting the front trim would turn out (and not the entire casing), but I have to say Im pleasantly surprised.  It adds just that little bit of interest and contrast, yet still retains the charm of the wood.


Wednesday 16 October 2013

Another TWO-TONED MCM Dresser!


Here is my latest installment.  I was lucky to find a few great condition MCM pieces recently!  My garage is currently struggling to contain them all (lucky me!).


I love a great two-tone look, so I decided to do it again on this lovely six-drawer.


I gave the entire body a really good sand, and then put on two coats of primer, before painting on 3-4 coats of off-white.


I use a satin sheen, as I am not a fan of glossy paint.  I used some clear wax to protect and add an extra layer of durability.


For the drawer facings, I sanded them down and topped them with some walnut stain for a great contrasting and contemporary look.


I really love the handles on this piece.  I had a chance to pick up the matching tallboy at a steal, but I hesitated because the condition was a bit drabby-drab.  I might sneak back and see if it is still available though...  


Stay tuned for some more MCM transformations, and maybe some colour too!  Its time for a dose of turquoise!

Monday 7 October 2013

A Tall Frenchman in Green

This dapper dresser was in dire need of some love when I picked him up. 


He belonged to a young girl who had a fascination with graffiti, named Brittany.  I know this, because she practiced those graffiti skills all over this poor dresser. My powers of deduction tell me Brittany liked The Back Street Boys, was in love with a boy named Brandon, and the stickers plastered all over the side indicate she enjoyed the Teenage Mutant Ninja Turtles.


 Needless to say, a lot of prep work was involved in making a blank canvas and undoing some of Brittany’s, (ahem), art skills. 


 I had mentioned in my previous post that I wanted to paint in green.  I custom mixed up this colour and admit that I tweaked it a bit with each additional coat to get a shade I was happy with. It was a bit of an evolving process to get the tone just right (not too bright, not too rustic) It reminds me a little bit of ASCP 'Florence'.


I topped with a touch of black glaze and did a light distressing because I felt it needed to be ‘aged’ up just a touch.


Here is a glimpse of just some of the creative flair young Brittany possessed.