Showing posts with label vintage. Show all posts

Thursday, 22 January 2015

Weathered Turquoise Night Stands

It felt so good to do these pieces with their wonderful imperfections.  Lately I have been doing so many pieces with no distressing that I really need a perfect finish in order to get the 'look' I'm going for.  So when I picked up this three piece set (9 drawer pictures to follow) I thought,  'Im blowing the dust off the orbital and doing some serious distressing'.


Its not that distressing pieces is easier...it can take a long time to distress, particularly if you are doing it by hand, but its just a little less worrisome because if there is a little flaw in the finish you don't have to worry and redo it.  I actually just recently finished a nine drawer in that deep blue cobalt colour I have been using a lot lately and I think in total I did 8 coats on the top.  I kept having problems getting a perfect finish, and then I had trouble with my polyurethane topcoat looking streaky and I just wasn't happy with it.  8, maybe 9 coats later I finally nailed it.  Isn't the definition of insanity doing the same thing over and over again expecting different results? 

 
These beauties only took two coats.  Much easier.  I used Cottage Paint chalkpaint I had in a cream colour and I added some tint to get this blue-based turquoise. I painted it on roughly, deliberately missing parts here and there as it would make distressing easier later.

 
I used wax on these because there is a strong oak grain.  I am not a huge fan of wax, I find it really streaky, but as I have mentioned before I don't mind using it on weathered looking pieces, I also don't mind using it on 'oak' furniture as it doesn't look as streaky over the strong oak grain.

 
I did all of my sanding before waxing. I like a good dust storm.  I did wear a protective mask to save the lungs though.  I used the orbital on some parts, and used a piece of coarse sand paper on others and did it by hand.

 
Some of the nice oak grain.


The before.


Saturday, 24 May 2014

Minty Antique Dresser

This little beauty rounds out the set of furniture I picked up recently.  I found someone who loved the little set and wanted the dresser painted out to match the vanity and the headboard.


The treatment was much the same as before.  A little bit o' sanding, a little bit of chalkpainting and a topcoat of dark wax (poly first on the top for extra protection).
 
 
I did a fair bit of distressing on the piece as I wanted that rustic aged look. 
 
 
Its funny because when I picked up this set I was so excited.  I always love the way the transformations of these pieces look.  I admire the work Reeves does over at THE WEATHERED DOOR and was really excited to do an antique chest redo. 

 
But its strange, although they were super easy to do, and I didn't need an extra pair of muscles to manoeuver them around, I still prefer the big 9-drawer 70s style dressers I do - even though I risk a slipped-disk every time I shift them.  I guess we all have our own little style!
 
 
The piece came with a removable backer piece.  What do you think, with or without?
 

It is a super duper sunny day here today, so I am keeping this post short and sweet!  Enjoy the sunshine everyone.

Tuesday, 13 May 2014

Weathered Armoire with Vintage Paper

Hi everyone, here is my latest piece!  NOW. Before I go into details I first want to say that this is the first piece that I took pictures of against my new 'staging wall' which is in the garage.  I love taking pictures against my black and white floral wallpaper, but Mr Chuckle's and I were getting a bit weary of brining every single piece into the house to take pictures of..So, I thought I would try something new.
 
 
I am not particularly happy with the outcome of these pictures.  I tried a couple of different approaches to how much light I was letting in, but it still isn't an ideal result.  I will have to keep playing and trying to tweak a bit with future pieces.  So I apologize for the less than amazing pictures (not that my previous pictures were that much better! - they just had a prettier backdrop).
 
 
I don't usually work on armoires because they are not my favorite style of furniture, but I came across this piece as part of a matching set with the piece I finished in navy and gold (here) and figured I may as well take on both.
 
 
I knew I wanted to do something using my vintage Eaton's wallpaper which I have used on the inside of a few pieces, but I haven't really used on the outside of one yet.  I just love this paper - both the colours and the design are beautiful.   It is a pre-pasted wallpaper (yay!) so it was so easy to apply.
 
 
I custom mixed up a blueish green to match one of the colours in the wallpaper.  In the jar it looked more greenish, but surprisingly it came out a little more blue on the piece.  I know this because my good ol' neighbor caught sight of it and said ' now you can't tell me that one isn't blue!'.  If you have read this blog for a while, than you have met this neighbor before with some of the funny blunder comments he has made (I still like him despite this).
 
 
I knew I wanted rustic with heavy distressing on this piece because I haven't done a piece like this in a while and felt like getting a bit whimsical.  I have done a similar piece (here) many months ago, but I was ready for another turn.
 
 
I distressed heavily and wonderfully the wood grain poking through has a great 'orange' colour to it which ties in perfectly with the orange on the paper.  I also highlighted with light blue, mint, white and yellow.  A whole wash of colours mix up to make this piece special.
 
 
I wanted some extra height, so I added the legs - not the most traditional on an armoire like this, but they are removable, so if they aren't to everyone's taste, they are easily removed.
 
 
I used chalkpaint on this piece, and I sealed with polyurethane as I have been doing a lot lately.  The original hardware was spruced up with a dab of rub n buff!
 
 
I did a lot of heavy distressing, as well as some whitewashing on the side.
 
 
 Here is a close up of the great paper!

 
And the before!


Tuesday, 17 December 2013

Just another two-toned MCM


And Voila!  Another two-toned mcm.  This piece was awesome, I loved the wood pulls that stick out at both the top and the bottom of each drawer, it doesn't come out well in the pics, but in real life they add some great visual interest.


The piece itself was in really good shape.  There were a few dings and nicks in the top and sides of the unit, so after sanding back, I filled with two coats of wood filler, sanding well after each to smooth things out.  That took care of the problem and she looked good as new!


After cleaning off the sanding dust I primed the entire body of the dresser with 2 coats of GRIPPER.  I only started using this primer recently and I really love it.  It gives fantastic coverage and has awesome adhesion. I didn't sand back to the bare wood on this one, just a good deglossing, so fortunately I didnt need to whip out the Zinsser BIN for bleed through.


The drawer facings were in great condition and they have a wonderful colour that features warm amber/reddish tones, so I just gave them a good clean and left them original.


I considered staining the legs, but opted to paint the out instead to create a sense of airiness under the dresser.   I then painted with my Dulux Diamond in Pearl (2 coats) which I custom tinted to a creamy off-white.


She turned out great and was definitely worth the drive to pick up!

Thursday, 31 October 2013

One for the Stag N Doe

What a week.  I have been working painstakingly on a dresser that got quite the overhaul, and some matching nightstands.  It is one of those pieces that turns out to be ten times the amount of work than you expected.  Tomorrow I am buying a nice bottle of bubbly which I will uncork with vigor when it is all done. Not long now. I can see the light.

But lets save that post for another day.  Instead, lets talk about this beauty below.  She is a nice antique piece with a matching mirror.  I decided to donate a piece for Mr. Chuckle's sister's stag n' doe party in lead up to her pending nuptials.  They are raffling off a lot of prizes, and I thought, 'Hey. why not a piece of furniture?'.  So it was with that in mind that I kept my eye out for a nice piece.


I found this one at a steal.  It was at my favorite re-store.  I must have been quick that day, because usually these types of pieces get snapped up quickly.  I was so enthused I walked out without paying.  So literally, a steal.


I did pay on my next visit though, guilty conscience be damned.  It was in rough shape.  Mr. Chuckles and I had to do a lot of sanding and wood filling to bring this lady back to the land of the living. I believe she made a guest appearance on the Walking Dead at some stage in her past.


I love the little key hole details.  They are real locks too.  No keys, sadly. I know a lot of bloggers put knobs on these dressers, which I really like..but Im also a big fan of ring pulls. So I gave them a bit of a buff and left them original.


These pictures are appalling, I know.  I was in a rush.  The camera was cranky.  Dresser wouldn't sit still.  Bad photo session all round.


A bit of the distressing detail. I kept it pretty light all round.  I should also mention that I turned this into a chalk paint using PoP.  I like the patina of chalk paint/wax on these old pieces (I usually use latex acrylic and polyurethane).  I also waxed with MINWAX dark wax.  No clear.  But I find the Minwax dark wax to be subtle compared to most dark waxes, so you dont get that 'staining' in the paint finish.


And below is the before.  Certainly wouldn't stand out in a Miss America Pageant.  But hey, a little bit of make-up, some fancy lighting, and just a bit of well placed Hollywood tape, and whammo, say hello to Angelina Jolie.


HAPPY HALLOWEEN EVERYONE!

Monday, 9 September 2013

Brutalist style mcm beauties!

Oh Lordy, am I excited!!  And no, it isn’t because the men’s US Open Tennis final is just about to begin.  Ok, it is a little bit.  I am a die-hard tennis fan and I love a good match up, and this one between Rafa and Djokovic should be soooooo-perb! Painting furniture is my number one addiction, tennis is my second (wine is my third :))  But no, I am over the moon excited about this absolutely fabulous furniture I picked up at the weekend!


Initially my plan was to paint it out a two-toned original wood/ ivory white (similar to this post here), but it is in such amazing condition that I am going to leave it original.  The colour and the finish on these pieces is as en-trend as Lady Ga-ga perched a-top an apple ipad wielding a whole-wheat vegan wrap.


I only have pics of the nightstands at the moment, but the entire set (headboard, longboy, armoir, mirror) are all equally amazing.


I did some research and this style of furniture is themed as BRUTALIST in the style of Paul Evans.  Im lovin’ it! It channels a real gothic vibe to it.


Here is a pic of the lovely matching mirror. Oh, and ladies, as an added bonus, the gentlemen I picked this wonderful set up from was not only extremely patient as I wrestled with my stubborn tie-down straps, but more than just-a little handsome as well.  :)

Tuesday, 18 June 2013

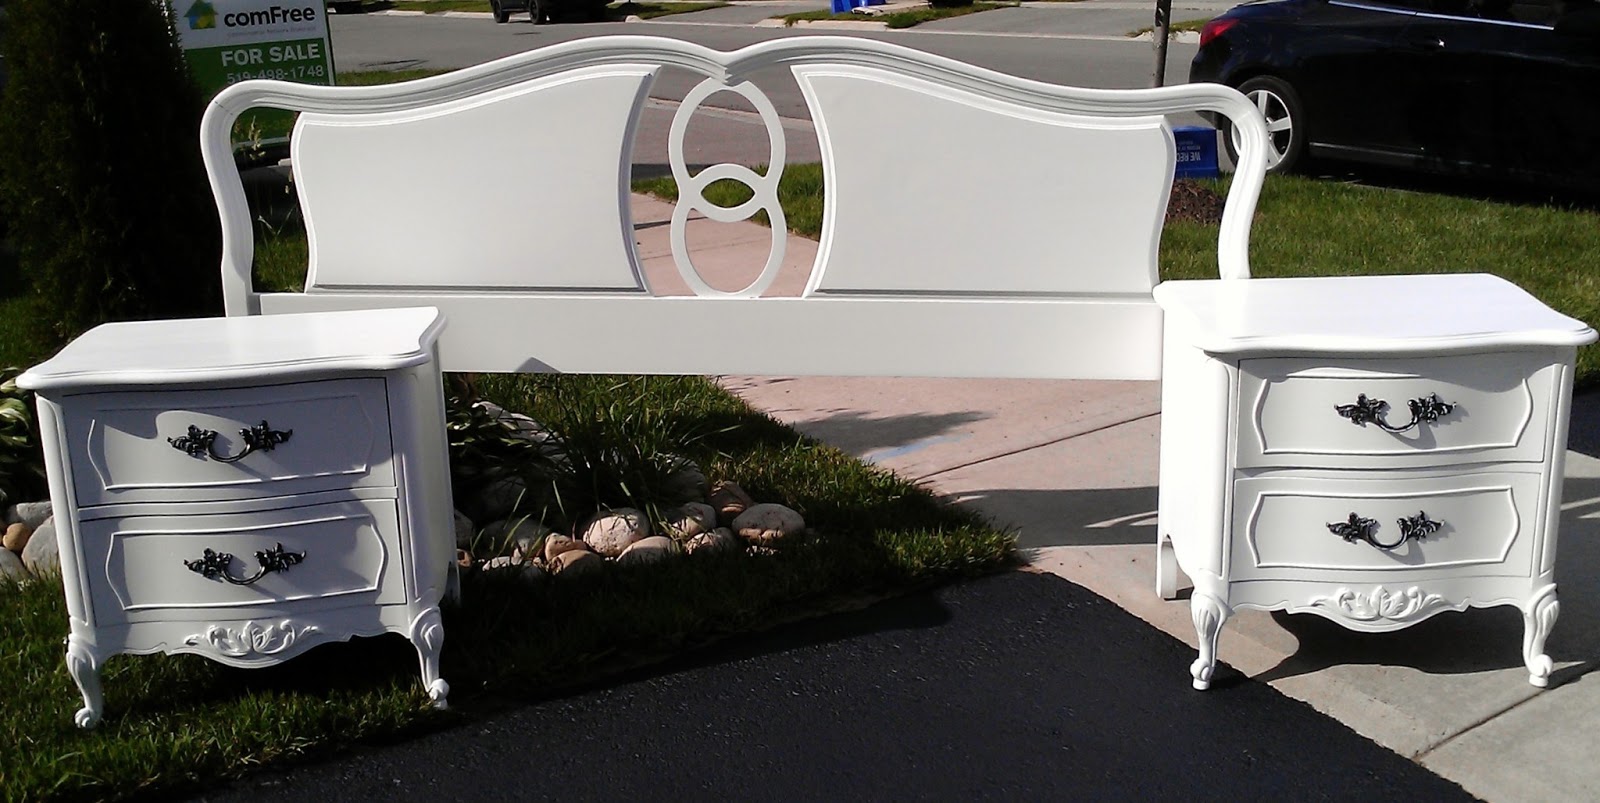
French Bedroom Set in White

I have been busy this week!  I picked up an absolutely beautiful French Bowfront Bedroom Set.  It is vintage Dixie furniture and truly gorgeous with its curvy lines and detailed trim.


Initially I wanted to paint each piece individually and not keep it as a set.  But in the end, I opted to keep it simple and 'matchy matchy' and went for pure white.


I did inject a bit of personality into the insides of the cupboards though, where I added some lovely silver/blue peacock inspired paper.  It gives it that little bit of 'wow' factor that it needs.


The pictures are less than average, I know.  Given the size and quantity of pieces, I had no choice but to snap them outside and in the garage. 


 The Armoir is probably my favorite piece.  The lines are so elegant and romantic, and I love how great the paper looks on the inside.  Such a great surprise when you open it up.


There is me peeking out in the mirror.  It looks like Im proudly holding the broom.


Don't you feel so lucky when you come across gorgeous furniture.  It hardly takes any effort at all!  (Well maybe just a bit: sanding, 2 coats of primer, 4 coats of paint, and a topcoat)...Its worth it in the end though and when you see the finished results.